개발/Spring Boot
스프링부트(Spring Boot) 게시판 만들기 #4 - mysql 연결하기
chansungs
2023. 9. 19. 07:00
728x90
반응형
환경
- intellij, 자바11, mysql, mybatis, jsp
오늘은 mysql에 테이블을 만들고 springboot 의 mysql 환경을 만들도록 하겠습니다.
우리는 프로젝트를 만들때 maven을 선택했기 때문에 pom.xml 을 확인해보도록 하자
pom.xml 파일에 보면 이렇게 mysql 의존이 되어 있다.
프로젝트를 만들때 mysql 을 선택해줬기 때문!!
<dependency>
    <groupId>com.mysql</groupId>
    <artifactId>mysql-connector-j</artifactId>
    <scope>runtime</scope>
</dependency>
application.properties 파일에서 아래처럼 만들어둔 mysql 의 접속정보를 입력해준다.
spring.datasource.driver-class-name = com.mysql.cj.jdbc.Driver
spring.datasource.url=jdbc:mysql://localhost:3306/study
spring.datasource.username=root
spring.datasource.password=1234qwer!!
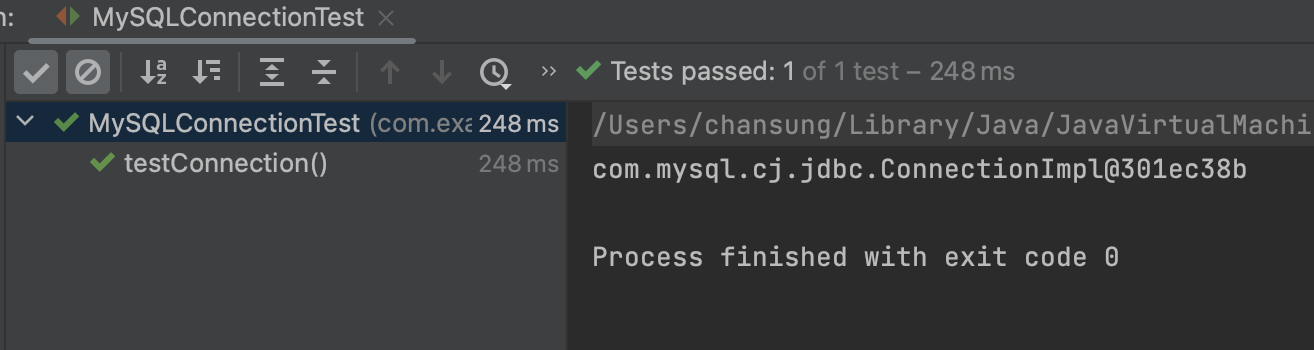
입력한 값이 맞는지 확인을 해보자!
테스트 파일을 만들고 환경설정에서 입력한 값을을 입력하면 된다.

package com.example.springbasic;

import org.junit.jupiter.api.Test;

import java.sql.Connection;
import java.sql.DriverManager;

public class MySQLConnectionTest {

    private static final String DRIVER = "com.mysql.cj.jdbc.Driver";
    private static final String URL = "jdbc:mysql://localhost:3306/study";
    private static final String USER = "root";
    private static final String PASSWORD = "1234qwer!!";

    @Test
    public void testConnection() {

        try {
            Class.forName(DRIVER);
            Connection connection = DriverManager.getConnection(URL, USER, PASSWORD);
            System.out.println(connection);
        } catch (Exception e) {
            e.printStackTrace();
        }

    }

}
성공이면 초록색 체크와 DB의 주소를 확인할 수 있다.
저번글에서 깃을 만들었는데 블로그 주인장의 깃도 확인이 가능하다.
별거없지만 잘 안되거나 빠르게 확인을 하고싶다면 주인장의 깃헙을 통해 확인하면 된다.
https://github.com/pork1375/spring-basic
GitHub - pork1375/spring-basic
Contribute to pork1375/spring-basic development by creating an account on GitHub.
github.com
감사합니다.
728x90
반응형